
To deploy a web application to an IIS server using Azure DevOps, you need to configure a build pipeline that generates a deployable artifact, along with a release pipeline that uses a deployment group to target your IIS server.
Prerequisites
- An Azure DevOps project
- A Windows server with IIS installed
- Azure Pipelines agent installed on the target IIS server
- Web Deploy installed on the IIS server to handle deployments
Create a Build Pipeline
The build pipeline compiles your code and packages it into a deployable artifact (usually a ZIP file).
- In Azure DevOps, go to Pipelines > Pipelines, then select New Pipeline
- Choose your repository and select a suitable template (e.g., ASP.NET Core) or configure using YAML
- Make sure the pipeline includes tasks to:
- Publish the application to an output directory (e.g.,
$(Build.ArtifactStagingDirectory)) - Add a Publish Pipeline Artifact task to make the output available for the release pipeline
Set Up a Deployment Group
A deployment group is a logical set of target machines that have an Azure Pipelines agent installed, allowing Azure DevOps to coordinate deployments to those servers.
- Navigate to Pipelines > Deployment groups and select New.
- Enter a name and description, then select Create.
- On the next screen, select Windows as the target type and follow the instructions to copy the registration script.
- On your IIS server, open an administrator PowerShell command prompt, paste the script, and run it to register the server with the deployment group.
- Enter authentication type (press enter for PAT) > PAT
- Enter personal access token >
- Creating personal access token: On the user settings (upper right) click personal access tokens (should choose read & write)
- Copy the token and paste it in the prompt
- Once completed, you should have this folder in the server:
Create a Release Pipeline
The release pipeline takes the artifact from the build pipeline and deploys it to the target server using the agent in the deployment group.
- Navigate to Pipelines > Releases and select New release pipeline.
- Select the IIS website deployment template, or an Empty job if you prefer to add tasks manually.
- Add an Artifact: Link the build pipeline you created in Step 1.
- Configure the Stage: Select the stage, then under Agent job, change the “Run on” option to Deployment group and select the group you created in Step 2.
- On IIS Deployment, select the Deployment group you recently created.
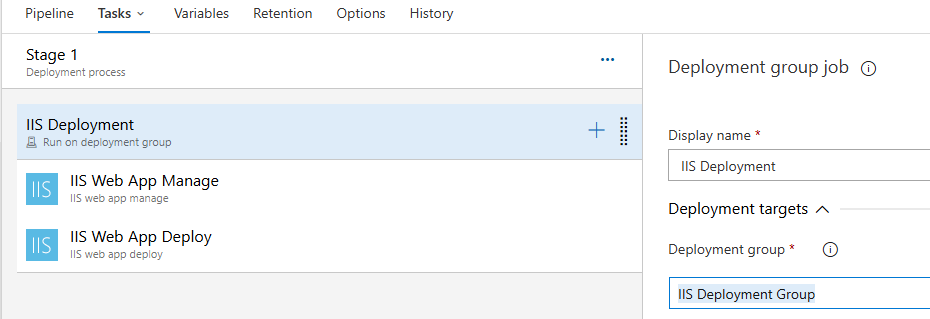
- Add Deployment Tasks:
- Add an IIS Web App Deploy task. (The older IISWebAppDeployment@1 task is deprecated, using a newer approach like the WinRM tasks or the deployment group tasks).
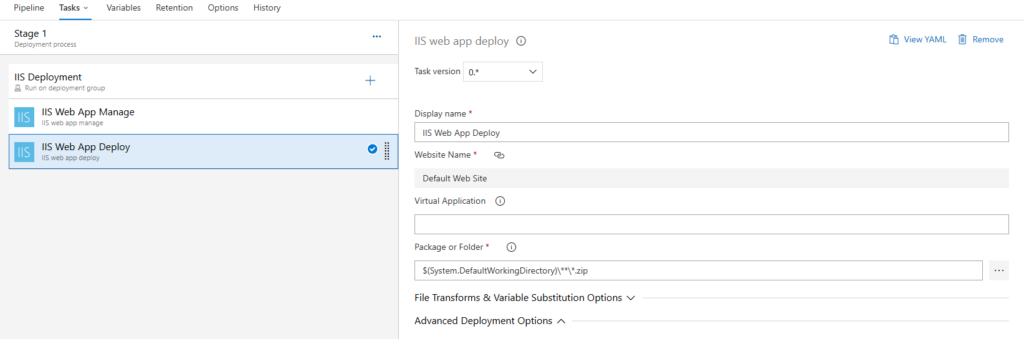
- Add an IIS web app manage task.
- Configure the task with the website name (e.g., “Default Web Site”) and the physical path on the server (e.g., C:\inetpub\wwwroot\YourAppName).
- Ensure settings like “Take App Offline” are configured as needed to prevent “file in use” errors during deployment.
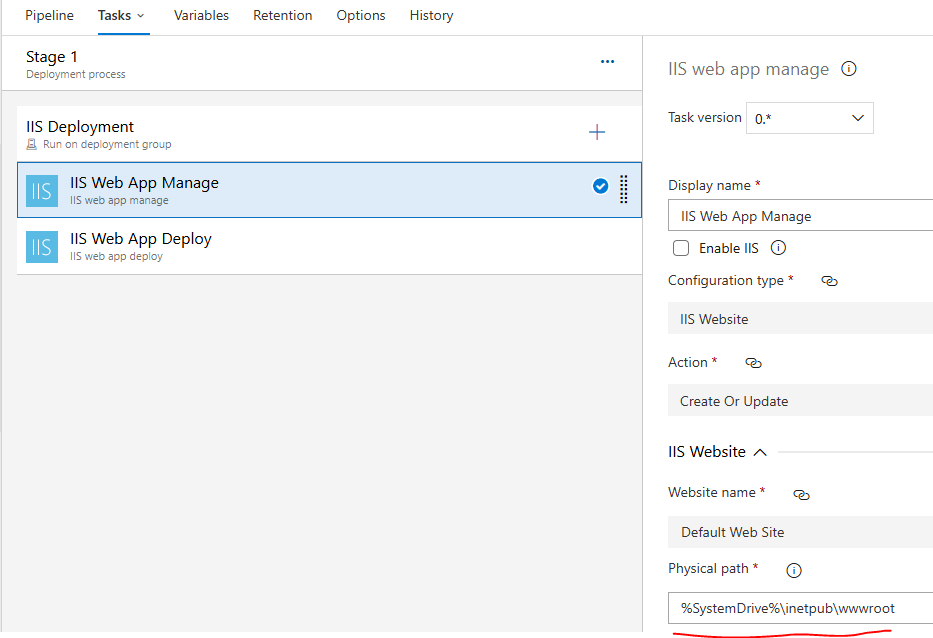
- Save the pipeline and create a new release to initiate the deployment.