Docker Compose is a tool that you will use to define and share multi-container applications. This means you can run a project with multiple containers using a single source, you will need to create a YAML file to define the services you need and run with a single command.
docker-compose.yml
services:simplecore.api:container_name:simplecoreapi.from.docker.composed#image: bindplus.api.v2 # will use imageimage:${DOCKER_REGISTRY-}simplecoreapi:1.0.0# will use Dockerfilebuild:context:.# ASP-NET-Core-Simple-API replace with the actual name of your project, docker file locationdockerfile:ASP-NET-Core-Simple-API/Dockerfileports:-49195:80#[targer port]:[docker file port]
The docker-compose.override.yml is the configuration file where you can override existing settings from the docker-compose.yml or can even add completely new services.
In program.cs, let’s assign variables to the configurations
var serviceName = builder.Configuration["AppConfig:ServiceName"]; // Access the ConfigMap value
var userPassword = builder.Configuration["UserConfig:SecretPassword  "]; // Access the Secret value

var app = builder.Build();
Create a controller to view the configs:
app.MapGet("/getconfigs", () =>
{
    var response = new {
        Version = "V1",
        Service = serviceName,
        Password = userPassword,
        Machine = System.Environment.MachineName
    };

    Console.WriteLine(response);

    return Results.Ok(response);
});
When you run the application, the resul should be:
What if we have some changes in the Configmap? here’s what you can do:
We made some changes in the value for the SERVICE_NAME
configmap.yaml
apiVersion: v1
kind: ConfigMap
metadata:
  name: dotnet-app-config
data:
  # Example non-sensitive key-value pairs
  SERVICE_NAME: "My Awesome API Updated!"
We have 2 options to apply the changes:
kubectl rollout restart deployment my-app
$ kubectlapply-fconfigmap.yamlconfigmap/dotnet-app-configconfigured$ kubectlrolloutrestartdeploymentmy-dotnet-api-deploymentdeployment.apps/my-dotnet-api-deploymentrestarted$ curl http://localhost/getconfigs{"version":"V1","service":"My Awesome API Updated!","password":"s3retP@ssw`rd","machine":"my-dotnet-api-deployment-54bb4888f4-mnfd8"}
Delete all pods: kubectl delete pod <pod-name>
(New Pods will pick up the updated ConfigMap)
Note: When you re-applied the configmap, the result says: configured, meaning the changes were applied, however, if there are no changes, the result will be: configmap/dotnet-app-config unchanged
Kubernetes (often called K8s) is an open-source platform for automating the deployment, scaling, and management of containerized applications. Kubernetes helps you manage many containers across multiple machines efficiently.
Why Kubernetes? Modern applications are often microservices-based—many small services that need to communicate and scale independently. Managing these manually is tough. Kubernetes provides: Automatic scaling: Adjusts the number of running containers based on demand.
Service discovery & load balancing: Routes traffic to the right containers.
Rolling updates: Updates applications without downtime.
Storage orchestration: Connects applications to storage systems automatically.
Think of it as a traffic controller and manager for containers, ensuring they run reliably, scale efficiently, and communicate properly.
Core concepts Cluster: A group of machines (nodes) where Kubernetes runs your applications. There’s usually a master node (control plane) and worker nodes.
Node: A single machine (physical or virtual) that runs your containerized apps.
Pod: The smallest deployable unit in Kubernetes. It can contain one or more containers that share resources like storage and network.
Deployment: Defines how to run and scale your pods (e.g., “run 5 instances of this app”).
Service: Exposes your pods to the network and balances traffic between them.
ConfigMap / Secret: Manage configuration and sensitive data separately from your application code.
Ingress: Manages external access to your services, usually via HTTP/HTTPS.
Kubernetes Architecture
Control Plane (Master Node): API Server: Entry point for all commands. Scheduler: Decides where pods should run. Controller Manager: Maintains desired state (e.g., number of pods).
Worker Nodes: Run the pods and containers. Kubelet: Ensures containers in pods run as expected. Kube-proxy: Handles networking and load balancing.
Add-ons: Ingress for external traffic. ConfigMaps/Secrets for configuration and sensitive data.
Kubernetes Basics
kubectl – CLI to interact with Kubernetes.
Cluster – Set of nodes (master + worker nodes).
Node – VM or physical machine running pods.
Pod – Smallest deployable unit; can contain one or more containers.
Deployment – Manages stateless apps, scaling, and rolling updates.
Service – Exposes pods inside or outside the cluster.
Namespace – Virtual cluster for resource isolation.
# Createnamespacekubectlcreatenamespace my-namespace# Use namespacekubectl config set-context --current --namespace=my-namespace# Get resources in namespacekubectl get pods -n my-namespace
If you see other HorizontalPodAutoscalers with different names, it means they already existed and this is usually not an issue.
Please note that the current CPU utilization is 0% because no clients are sending requests to the server. The TARGET column reflects the average CPU usage across all Pods managed by the corresponding deployment.
Let’s increase the load
Next, observe how the autoscaler responds to increased load. To do this, you will start a separate Pod that acts as a client. The container inside this client Pod runs an infinite loop, continuously sending requests to the php-apache service.
Note: It’s better to run this in a separate terminal so that the load generation continues and you can carry on with the rest of the steps
kubectlrun-i--ttyload-generator--rm--image=busybox:1.28--restart=Never--/bin/sh-c"while sleep 0.01; do wget -q -O- http://php-apache; done"Allcommandsandoutputfromthissessionwillberecordedincontainerlogs,includingcredentialsandsensitiveinformationpassedthroughthecommandprompt.Ifyoudon't see a command prompt, try pressing enter.OK!OK!OK!OK!OK!OK!OK!OK!OK!OK!OK!OK!OK!OK!OK!OK!OK!OK!OK!OK!OK!OK!OK!OK!OK!OK!OK!OK!OK!OK!OK!OK!OK!OK!OK!OK!OK!OK!OK!OK!OK!OK!OK!OK!OK!OK!OK!OK!OK!OK!OK!OK!OK!OK!OK!OK!OK!OK!OK!OK!OK!OK!OK!OK!OK!OK!OK!OK!OK!OK!OK!OK!OK!OK!OK!OK!OK!OK!OK!OK!OK!OK!OK!OK!OK!OK!OK!OK!OK!OK!OK!OK!OK!OK
Now run: (type Ctrl+C to end the watch when you’re ready)
Here, CPU consumption has increased to 305% of the request. As a result, the Deployment was resized to 7 replicas and also, you should see the replica count matching the figure from the HorizontalPodAutoscaler
Note: It may take a few minutes for the number of replicas to stabilize. Because the load is not explicitly controlled, the final replica count may differ from the example shown.
Stop generating load To complete the example, stop sending traffic to the service.
In the terminal where you started the Pod running the BusyBox image, stop the load generation by pressing Ctrl + C.
Then, after about a minute, verify the resulting state:
Once CPU utilization dropped to 0, the HPA automatically scaled the replicas back down to 1. Please note that autoscaling adjustments may take a few minutes to complete.
Clean Up Resources
Once you have finished the demo, delete the resources:
Introduction to kubernetes using the simple .net core api image from docker container registry
Basic nderstanding of deployment and service yaml file in kubernetes.
Using minikube
Kubernetes Service and Deployment are two fundamental components of the Kubernetes ecosystem.
The Service acts as the gateway for communication and load balancing. On the other hand, Deployment orchestrates the management and scaling of your application’s replicas.
Minikube is a lightweight and simplified version of Kubernetes, primarily used for local development and testing purposes.
What is minikube used for?
You can use Minikube to learn how to deploy and manage applications in Kubernetes.
Minikube can be used to develop Kubernetes applications and test your applications before deploying them to production.
What is the difference between Kubernetes and minikube?
On the Deployment Scale: Kubernetes is designed for large-scale deployments across multiple nodes and clusters, making it suitable for managing complex and distributed environments. On the other hand, Minikube is a lightweight and simplified version of Kubernetes, suitable for local development and testing purposes.
$minikubetunnel╭──────────────────────────────────────────────────────────────────────────────────────────────────────────╮│ ││ Youaretryingtoruntheamd64binaryonanM1system. ││ Pleaseconsiderrunningthedarwin/arm64binaryinstead. ││ Downloadat https://github.com/kubernetes/minikube/releases/download/v1.32.0/minikube-darwin-arm64 ││ │╰──────────────────────────────────────────────────────────────────────────────────────────────────────────╯✅ Tunnelsuccessfullystarted📌 NOTE:Pleasedonotclosethisterminalasthis process must stay alive for the tunnel to be accessible ...❗ Theservice/ingresssimple-core-apirequiresprivilegedportstobe exposed: [80]🔑 sudopermissionwillbeaskedforit.🏃 Startingtunnelforservicesimple-core-api.Password:
Create docker image using this command: docker build -t [image name] [docker file location]
Example:
dockerbuild-t simplecoreapi:1.0.0.
Step 4: Docker Container
Create docker container using this command: docker run -d -p [port]:[exposed port] –name [container name] [image name] Example: (Note it will return the container id)
Note: exposed port should be the same as the exposed port in the docker file.
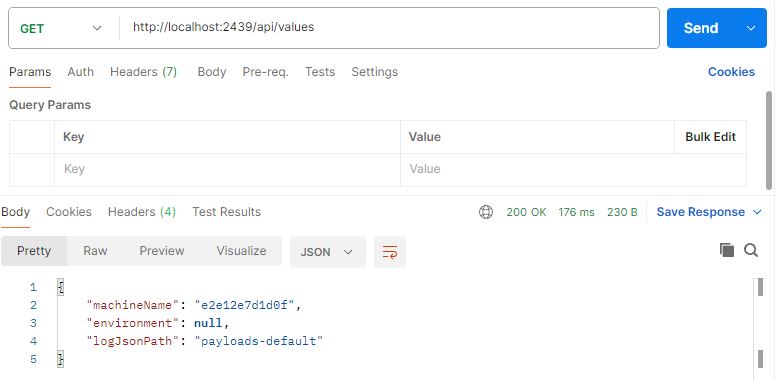
Step 5: Let’s test it!
Testing our container using Postman:
Accessing the files in the container
The snap shot below is from Docker desktop, you can see that the files generated by the api are stored in the payloads-default folder, which is configure in the appsettings.json:
Docker Container Shell
We can also access the files saved using the docker container shell, here I will show you, take note I switched to my windows machine, here’s what I did:
We need to get the container Id using the command: docker ps
Run bash inside the container using the command: docker exec -it 1653 sh //1653 is the first 4 character of the container id
inside the shell, change the directory to payloads-default to list the files created.
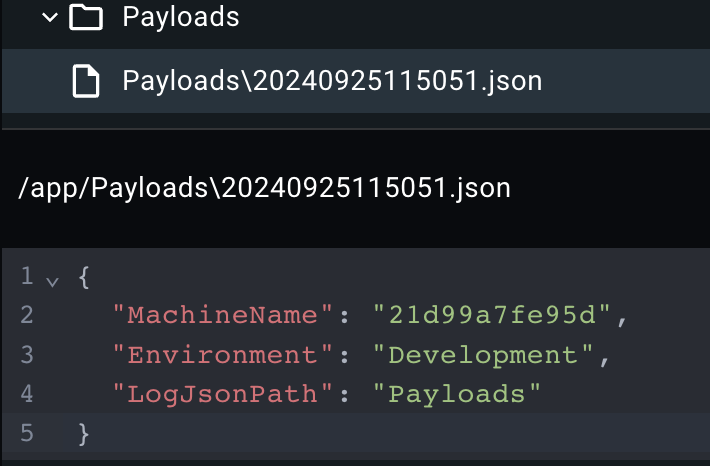
In the excerpt of the saved payload below, notice that the values of the Environment and LogJsonPath are from the environment passed.
Note:
· “LogJson__Path=Payloads” is the same as in appsettings.json: “LogJson”: { “Path”: ” payloads” }
· Will work if not assigned/declared in appsettings.json
· Overriding appsettings file
· To override environment variables, remove them from the appsettings file
Docker Volumes
Volumes are a mechanism for storing data outside containers. All volumes are managed by Docker and stored in a dedicated directory on your host, usually /app for Macbook systems.
Volumes are mounted to filesystem paths in your containers. When containers write to a path beneath a volume mount point, the changes will be applied to the volume instead of the container’s writable image layer.